Windows Cannot Access Shared Folder You Do Not Have Permission Fix
You need not worry if you face a ‘Windows cannot access shared folder’ error in Windows 11. In this article, we will be discussing how you can fix ‘Windows cannot access shared folder’ in Windows 11 easily.
Give Network Sharing Permission
If you face this problem, it can be because you are not given permission to do so. To access the shared folder, you must have permission. You can either give permission to access the particular file in the drive or the complete drive. To do so, follow the steps given below-
Open the File Explorer on your PC by pressing the Windows + E key combo.
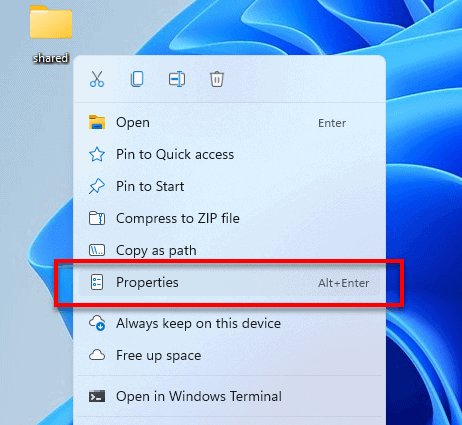
Now head to the file/folder which you want to access and select. Right-click on it, and then click on Properties. If you want to give the network sharing permission to the whole drive, select the drive, right-click, and click on Properties. Head to the Sharing tab in the Properties.
In the Sharing tab, click on Advanced Sharing. Now check the Share this folder checkbox. You will be asked to enter the Share name. Enter the name, and click on Permissions.
Now, select Everyone, check all the options, and then click on OK.
This way, you will have successfully given network sharing permissions to access the shared folder. READ: How To Password Protect a Folder In Windows 11
Give Security Permission
Another reason you may face this issue is that you don’t have the correct security permission. To give security permission and to be able to access the shared folder, follow the steps given below-
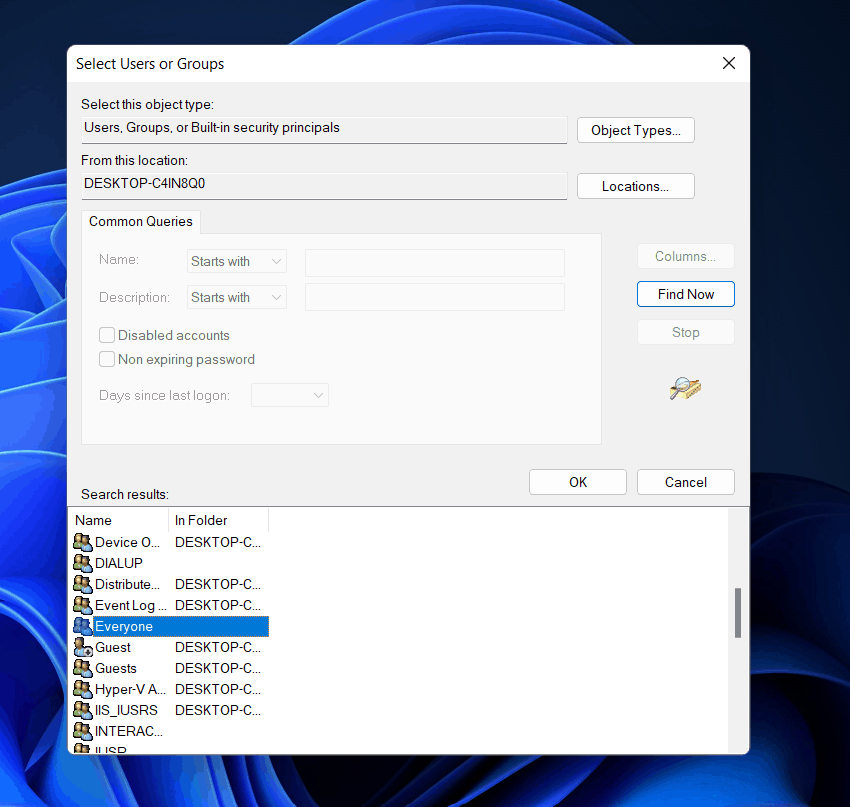
Open the File Explorer on your PC. You can do so by pressing the Windows + E key combo. If you want to give permission for the whole drive, then select the drive partition. Right-click on it, and then click on Properties. If you want to give access permission to only a particular file, then head to the folder’s location in the File Explorer. Right-click on the folder, and then click on Properties. Head to the Security tab in the properties, and then click on Edit. Here click on Add and then click on Advanced.
Click on Find now, and select Everyone. Now click on OK.
You will now see Everyone under the Enter the object names to select section. Click on OK.
Now click on Apply and then click OK to save the changes and give security permission.
After you have the security permission to access the file, you will access the file without facing the ‘Windows cannot access shared folder’ error in Windows 11. READ: How To View Hidden Folders and Files In Windows 11
Bottom Line
This is how you can fix the ‘Windows cannot access shared folder’ error in Windows 11. Following the above steps, you will be able to access the shared folder that you were not able to earlier. We hope this article helps solve the issue you were facing.
How Do I Access A Shared Folder Which I Am Unable To Access?
We have already discussed certain steps and troubleshooting methods to fix the issue of not being able to access a shared folder. Following the steps mentioned in this article, you will be able to access a shared folder easily.
Δ